Triangulated Surfaces
With this application, users can create 3D surfaces such as:
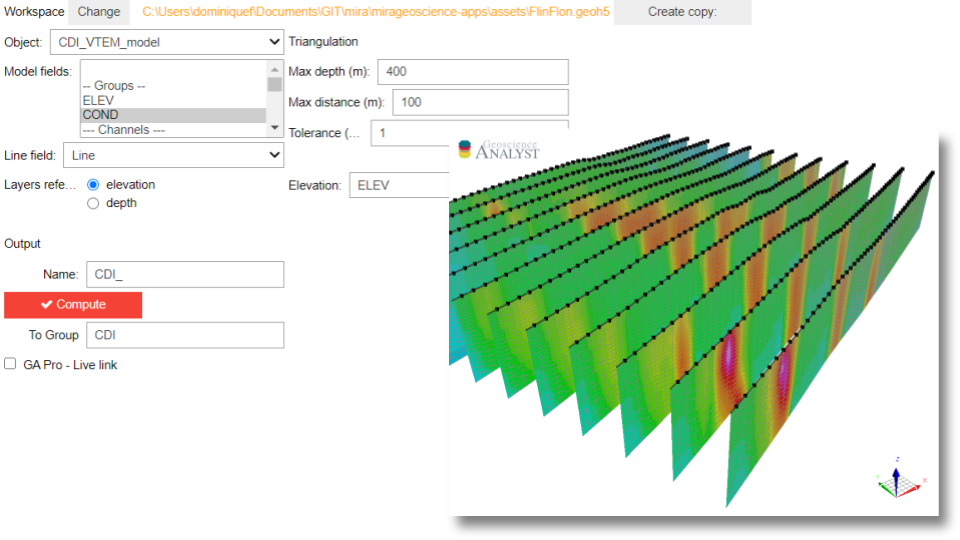
Vertical sections from CDI or Stiched-1D
Curvemodels.Horizons from object vertices and data
The application leverages the Scipy.spatial.Delaunay 2D triangulation routine.
New user? Visit the Getting Started page.
Application
The following sections provide details on the different parameters controlling the application. Interactive widgets shown below are for demonstration purposes only.
[1]:
from geoapps.triangulated_surfaces import Surface2D
app = Surface2D(h5file=r"../../../assets/FlinFlon.geoh5", plot_result=True)
app()
Project Selection
Select and connect to an existing geoh5 project file containing data.
[2]:
app.project_panel
See the Project Panel page for more details.
Object/Data Selection
List of objects and associated data pulled from the target workspace. The data fields are transfered to the newly created surface.
[3]:
app.data_panel
Surface type
Assumption about the type of triangulation to be performed.
[4]:
app.type
Option 1: Sections
The triangulation occurs along line and at depth corresponding to the Vertical Reference parameter. It is expected that the Data and Elevation information is provided as Data Groups where each element of the group corresponds to a layer of the CDI or stitched-1D model. A Line parameter must be provided in order to break the surface along its parts.
[5]:
import numpy as np
from geoapps.utils.plotting import plotly_surface
import plotly.offline as py
app.trigger.click()
figure = plotly_surface(app.surface, intensity=np.log10(app.models[0]), cmin=-4.0, cmax=-1.5)
figure.show()
Option 2: Horizon
Here the triangulation occurs on the XY plane only with the vertical relief determined by the Vertical Reference parameter. The operation can only be performed on a single elevation/depth channel at a time. Below we simply loop over a range of ELEV and COND values to create multiple depth sections.
[7]:
app.type.value = "Horizon"
figure = None
for ii in range(3,24,5):
app.elevations.data.value = [opt[1] for opt in app.elevations.data.options if opt[0] == f"ELEV[{ii}]"][0]
app.data.value = [app.data.options[ii][1]]
app.trigger.click()
figure = plotly_surface(app.surface, figure=figure, intensity=np.log10(app.models[0]), cmin=-4.0, cmax=-1.5, showscale=ii==3)
py.iplot(figure)
Vertical Reference
Define the vertical reference of the newly create surfaces.
Sections
Determine the elevation of each layer cells such that the top edge of the section lies along the topography. The application expects that the number of data channels of the selected Data Group matches the number of channels in the selected Data/Model fields.
Horizons
Z-elevation of each node as determined by the elevation data field. If no field is selected, the application uses the Object’s vertices (Points, Curves) or centroids (Grid2D).
[8]:
app.z_option.value = 'depth'
app.depth_panel
Elevation
Use elevation values in absolute height. No topography required.
Depth
Set the height channel as “depth” values relative to the Topography surface.
Topography
Define the ground surface from:
Object: Any object found in the target geoh5 project. The Z elevation can be chosen from the list of associated data.
Relative to Sensor: Use the target object vertices as reference. Assumes that the object lies directly on topography.
Constant: Set the ground to flat at a constant elevation.
Line field
Type ``Sections`` only
Define the line unique identifer used to break up the surfaces.
[9]:
app.lines.data
Maximum Distance
Set the maximum triangulation distance used in the Surface creation. Useful option for Sections with missing values or for Horizons with scattered input data.
[10]:
app.max_distance
Output Panel
Trigger the computation routine and store the result.
[11]:
app.output_panel
See the Output Panel page for more details.
Need help? Contact us at support@mirageoscience.com